
I get asked, periodically, if I make little girls aprons. I do not. I love them, they're darling, and the little girls wearing them is the cutest picture. I just don't have time, and I find I have to be careful how I diversify and add new products.

However, if you recall last April/May, I did make a whole batch for my little friend Rachel, who was turning 5 and having a tea party birthday. It was so fun, and it was so easy - too easy really, and I'd much rather share how I did it, rather than release a whole line of little sweets.
What I like about this little apron is the belt feature - I used a D-ring ribbon belt as the band/tie, which eliminates the frustration of little fingers trying to tie apron strings. A great tutorial on making a D-ring Ribbon Belt (as well as all the supplies) can be found on the J. Caroline Creative site (also a great resource for lots of fun stuff!) (note: since this was originally posted, J. Caroline has closed their craft supply site. Try Google!).
Really, this is very simple - but first a disclaimer! I have no idea how to write or explain what I do. For this project, I simply made a childs' apron, and snapped photos along the way. It's not perfect, and I'm sure many of you will be able to create something far better then what I am showing. But it's easy and your little girl will be over the moon! This is also a great gift bag item for a birthday party...especially if it's a tea party!

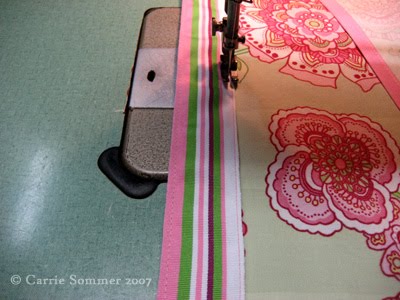
Start with a heavier weight home dec fabric. I suggest prewashing it, and pressing it. You will then cut it into a 16 x 21 piece. Also, assemble matching Extra Wide Double Fold Bias Tape and your ribbon belt (the belt I used is 40" long, finished, but you can make them as long or short as you need to).


Machine stitch the bias tape in place.

Press.

Then, with right side facing up, press the top line of fabric down about 1/2 inch. Alternatively, you can serge the raw edge here, and skip the pressing.

Pin in place, and stitch along the top edge.

When you get to the end of the apron, pivot and stitch down the side to the end of the ribbon and then along the bottom edge, pivot again and stitch to meet up again where you started.
Cut your threads, press, and you are done! Wasn't that easy? Isn't it darling?

Another totally cute and fun thing to do is embroider the girls' names on the apron, as I did for Rachel. You can write their names freehand with quilters chalk and then just go for it!
2 comments:
This is a fabulous idea, especially for a tea party birthday theme, it would be great to give guests as a thank you for attending and as a momento of the day.
You are a real inspiration.
Thanks for posting this tutorial! My little girl is having a cookie decorating birthday party today, and the girls are getting to take home super cute, easy to make aprons. Great pictures and instructions, thanks!
Post a Comment