(originally published March 24, 2010)
It's been SUCh a long time since I've done a refashion. I so needed this.
And really, this is the only way to get exactly what you want, both in a boyfriend, and the jeans. I've been wanting to do this for months, but you can probably guess, I've been uncontrollably lazy lately.
Power through.
I also have an unbelievably difficult time finding jeans that fit me. It has to do with hips, thighs, a bubble butt and a small waist. I am very thankful for the small waist, but it is responsible for a gap of at least 5 inches in most pants I try on. Waaaaaaay too much information, you're thinking. And you're right.
I love all the boyfriend jeans they are showing lately, so I dug into my stash of Levi's 577 that I haven't been wearing much of lately, and decided to sacrifice a pair. The nice thing about this project is that you can do anything you want. I saw a pair of patchwork boyfriend jeans recently, that I loved, and of course, did not fit me, so that was my inspiration.
I gathered together some fabric that mixed up well and my jeans. I decided I wanted them cropped with a rolled hem. After trying them on, and deciding where I wanted them, I hacked the bottom off of both legs and then turned up the hem about a 1/2 inch twice, steamed them good, and pinned.
Then I sewed the hem down, using a contrasting thread in red, just for fun.
Not shown: I then rolled them up 2-1/2 inches, steamed them good again, and sewed about a 1 inch space on the inner & outer seams, so they would [hopefully] stay in place (I'm sure they will need to be pressed after washing to stay flat).
I cut the fabric, freehand, in various uneven squares and a long rectangle, added some Stitch Witchery to the back [to give it some stability - you can skip this, or use whatever you have], and played with the placement of the patches. Then, ironed them in place.
I like little unexpected touches, so on the back of one leg, a few inches above the cuff, I decided to embroider a little bird from my Sublime Stitching pattern stash. My embroidery skills are quite rusty, but I'm into imperfection.
Then, to help the patches POP more, I added some whip-stitching around my patches, which will also help them adhere better since I didn't sew them on. Notice the imperfections :)
Strut your new boyfriend...
This was seriously easy - anybody can do it. Another easy idea is to just crop an old pair of jeans, hem them and then sew on a doily. It's simple and cute.
I think so at least...
Showing posts with label easy project. Show all posts
Saturday, September 4, 2010
Tutorial: Little Girls D-ring Belt Apron
(originally published January 29, 2007)
I get asked, periodically, if I make little girls aprons. I do not. I love them, they're darling, and the little girls wearing them is the cutest picture. I just don't have time, and I find I have to be careful how I diversify and add new products.
However, if you recall last April/May, I did make a whole batch for my little friend Rachel, who was turning 5 and having a tea party birthday. It was so fun, and it was so easy - too easy really, and I'd much rather share how I did it, rather than release a whole line of little sweets.
What I like about this little apron is the belt feature - I used a D-ring ribbon belt as the band/tie, which eliminates the frustration of little fingers trying to tie apron strings. A great tutorial on making a D-ring Ribbon Belt (as well as all the supplies) can be found on the J. Caroline Creative site (also a great resource for lots of fun stuff!) (note: since this was originally posted, J. Caroline has closed their craft supply site. Try Google!).
Really, this is very simple - but first a disclaimer! I have no idea how to write or explain what I do. For this project, I simply made a childs' apron, and snapped photos along the way. It's not perfect, and I'm sure many of you will be able to create something far better then what I am showing. But it's easy and your little girl will be over the moon! This is also a great gift bag item for a birthday party...especially if it's a tea party!
Start with a heavier weight home dec fabric. I suggest prewashing it, and pressing it. You will then cut it into a 16 x 21 piece. Also, assemble matching Extra Wide Double Fold Bias Tape and your ribbon belt (the belt I used is 40" long, finished, but you can make them as long or short as you need to).
Pin the bias tape in place on all three sides (both sides and bottom), leaving the top edge free.
Machine stitch the bias tape in place.
Press.
Then, with right side facing up, press the top line of fabric down about 1/2 inch. Alternatively, you can serge the raw edge here, and skip the pressing.
Pin in place, and stitch along the top edge.
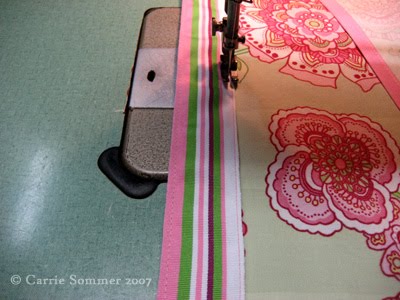
When you get to the end of the apron, pivot and stitch down the side to the end of the ribbon and then along the bottom edge, pivot again and stitch to meet up again where you started.
Cut your threads, press, and you are done! Wasn't that easy? Isn't it darling?
Another totally cute and fun thing to do is embroider the girls' names on the apron, as I did for Rachel. You can write their names freehand with quilters chalk and then just go for it!
I get asked, periodically, if I make little girls aprons. I do not. I love them, they're darling, and the little girls wearing them is the cutest picture. I just don't have time, and I find I have to be careful how I diversify and add new products.
However, if you recall last April/May, I did make a whole batch for my little friend Rachel, who was turning 5 and having a tea party birthday. It was so fun, and it was so easy - too easy really, and I'd much rather share how I did it, rather than release a whole line of little sweets.
What I like about this little apron is the belt feature - I used a D-ring ribbon belt as the band/tie, which eliminates the frustration of little fingers trying to tie apron strings. A great tutorial on making a D-ring Ribbon Belt (as well as all the supplies) can be found on the J. Caroline Creative site (also a great resource for lots of fun stuff!) (note: since this was originally posted, J. Caroline has closed their craft supply site. Try Google!).
Really, this is very simple - but first a disclaimer! I have no idea how to write or explain what I do. For this project, I simply made a childs' apron, and snapped photos along the way. It's not perfect, and I'm sure many of you will be able to create something far better then what I am showing. But it's easy and your little girl will be over the moon! This is also a great gift bag item for a birthday party...especially if it's a tea party!
Start with a heavier weight home dec fabric. I suggest prewashing it, and pressing it. You will then cut it into a 16 x 21 piece. Also, assemble matching Extra Wide Double Fold Bias Tape and your ribbon belt (the belt I used is 40" long, finished, but you can make them as long or short as you need to).
Pin the bias tape in place on all three sides (both sides and bottom), leaving the top edge free.
Machine stitch the bias tape in place.
Press.
Then, with right side facing up, press the top line of fabric down about 1/2 inch. Alternatively, you can serge the raw edge here, and skip the pressing.
Pin in place, and stitch along the top edge.
When you get to the end of the apron, pivot and stitch down the side to the end of the ribbon and then along the bottom edge, pivot again and stitch to meet up again where you started.
Cut your threads, press, and you are done! Wasn't that easy? Isn't it darling?
Another totally cute and fun thing to do is embroider the girls' names on the apron, as I did for Rachel. You can write their names freehand with quilters chalk and then just go for it!
Sunday, August 29, 2010
Tutorial: Lingerie and/or Utility Bag
originally published January 2, 2008)
Happy New Year my dear sweet blog friends! I was cleaning the studio yesterday (I know, *gasp!*), and I came across a bunch of lingerie bags from a while ago when I offered them on my site. I think I pulled them a year ago...they didn't sell well (read: at all), and while it might have been a good idea, perhaps not a good product offering.
In the year since, I've used them in many ways other than their intended purpose. Turns out, they are the perfect size for shoes, and work well when traveling. They are also a fabulous project bag, especially now that I am knitting and have a few things going at once.
They are also quite easy to make, and that is what I want to share with you today!
To start, you'll need about a 1/2 yard of fabric, folded and about a 36" piece of twill tape or ribbon (plus, thread, scissors and...a sewing machine...duh.). I'm using a lightweight linen here. I've made a simple pattern with a 12" x 18" piece of posterboard. Place the posterboard directly on the fabric with one edge on the fold.
Trace pattern directly onto fabric, and then cut out. You'll end up with a long rectangle of fabric when open.
If you are using a plain fabric (like I am here), you can easily embellish the bag later with embroidery, stencils, patchwork or little die-cut pieces of fabric. I think I'll add some fun die-cut fabric pieces. I found some simple shapes online and printed them out to make a little pattern, and then cut them out of some fun fabric.
(Not shown: I also used the die-cut patterns to cut out a piece of double-sided interfacing to help adhere the die-cuts to the linen later.) Put these aside for now.
Next, take your main fabric, open it, and with the wrong side facing you, press the top 4 inches of the sides in. That's not articulated very well, but check out the photo above and below, and do like that! You don't have to measure with this project, just eyeball it.
Do this on all four corners/sides. Then, press down the two top edge pieces about 2 inches from the top. You could serge this if you want, I did not.
Next, sew this piece down about 1/4" from the cut edge.
Then, using your sewing machine guide, sew across again with a 3/4" seam allowance. By doing this, you are creating a little tube for the drawstring.
Next, remember your cute embellishment? Now is the time to attach it. If you are using a die-cut piece of fabric, first adhere it to the right side of the fabric with lightweight double-sided fusible interfacing.
You can then embellish it further with embroidery - I whipstitched around the bra & bikini shown above (but forgot to take a picture of it! sorry!).
Then, turn the piece wrong side out, matching up the top pieces, and begin stitching the sides together below the last horizontal stitch line. You can start at the 1/4" seam allowance guide on your machine, because that turned in portion at the top will end, and you will continue at 1/2" seam allowance down the side of the bag. *Just remember not to start at the very, tippy top of the bag or your won't be able to insert your drawstring!
If you'd like, you can clip the bottom corner of the bag. Then turn it right-side out and press.
Take your twill tape or a piece of ribbon and attach a safety pin...
insert it into the second opening at the top and pull it through to the end. Then, insert it into the other side and continue pulling it through.
Make a little knot at the end so that little guy doesn't go anywhere...
Cinch it tight, and you are done!
Oh, look. Now I have three new utility bags! A lingerie bag, a shoe bag, and (*slaps forehead*) a knitting project bag!
I know which one I'll be using!
I hope you try this! Contrary to my super anal instructions, it's very, very, very easy! Enjoy!
Happy New Year my dear sweet blog friends! I was cleaning the studio yesterday (I know, *gasp!*), and I came across a bunch of lingerie bags from a while ago when I offered them on my site. I think I pulled them a year ago...they didn't sell well (read: at all), and while it might have been a good idea, perhaps not a good product offering.
In the year since, I've used them in many ways other than their intended purpose. Turns out, they are the perfect size for shoes, and work well when traveling. They are also a fabulous project bag, especially now that I am knitting and have a few things going at once.
They are also quite easy to make, and that is what I want to share with you today!
To start, you'll need about a 1/2 yard of fabric, folded and about a 36" piece of twill tape or ribbon (plus, thread, scissors and...a sewing machine...duh.). I'm using a lightweight linen here. I've made a simple pattern with a 12" x 18" piece of posterboard. Place the posterboard directly on the fabric with one edge on the fold.
Trace pattern directly onto fabric, and then cut out. You'll end up with a long rectangle of fabric when open.
If you are using a plain fabric (like I am here), you can easily embellish the bag later with embroidery, stencils, patchwork or little die-cut pieces of fabric. I think I'll add some fun die-cut fabric pieces. I found some simple shapes online and printed them out to make a little pattern, and then cut them out of some fun fabric.
(Not shown: I also used the die-cut patterns to cut out a piece of double-sided interfacing to help adhere the die-cuts to the linen later.) Put these aside for now.
Next, take your main fabric, open it, and with the wrong side facing you, press the top 4 inches of the sides in. That's not articulated very well, but check out the photo above and below, and do like that! You don't have to measure with this project, just eyeball it.
Do this on all four corners/sides. Then, press down the two top edge pieces about 2 inches from the top. You could serge this if you want, I did not.
Next, sew this piece down about 1/4" from the cut edge.
Then, using your sewing machine guide, sew across again with a 3/4" seam allowance. By doing this, you are creating a little tube for the drawstring.
Next, remember your cute embellishment? Now is the time to attach it. If you are using a die-cut piece of fabric, first adhere it to the right side of the fabric with lightweight double-sided fusible interfacing.
You can then embellish it further with embroidery - I whipstitched around the bra & bikini shown above (but forgot to take a picture of it! sorry!).
Then, turn the piece wrong side out, matching up the top pieces, and begin stitching the sides together below the last horizontal stitch line. You can start at the 1/4" seam allowance guide on your machine, because that turned in portion at the top will end, and you will continue at 1/2" seam allowance down the side of the bag. *Just remember not to start at the very, tippy top of the bag or your won't be able to insert your drawstring!
If you'd like, you can clip the bottom corner of the bag. Then turn it right-side out and press.
Take your twill tape or a piece of ribbon and attach a safety pin...
insert it into the second opening at the top and pull it through to the end. Then, insert it into the other side and continue pulling it through.
Make a little knot at the end so that little guy doesn't go anywhere...
Cinch it tight, and you are done!
Oh, look. Now I have three new utility bags! A lingerie bag, a shoe bag, and (*slaps forehead*) a knitting project bag!
I know which one I'll be using!
I hope you try this! Contrary to my super anal instructions, it's very, very, very easy! Enjoy!
Refashion: Fleece gloves to handwarmers
(originally published November 20, 2007)
It's getting cold in my studio/workshop/garage. Even if the fog burns off and the day warms up, unless it gets really hot, my workshop stays pretty cool. Which isn't so bad, but my hands get cold and I can't stand cold hands!
I've been coveting a pair of knit handwarmers since last winter and I've got all sorts of fabulous favorites over at Etsy, but I haven't found exactly what I'm looking for in terms of color and style. Then Erin went and knit up a whole batch a couple of weeks ago, and that really put me over the edge! I want to knit some too! I think that project will have to wait, as I am fully consumed by the never-ending knit scarf (which I still love!), and definitely don't have the skills yet for that sort of project.
But as I was thinking about my cold hands, and coveting (as I do), I remembered a pair of Old Navy fleece gloves that I had crammed into a drawer in my dresser. I hardly ever wore them, and I thought I might be able to make them at least partially cute.
I started by cutting off the fingers and thumb.
Then I whipstitched around the cut openings.
I used ordinary embroidery floss...simple.
That was easy, but I still thought they were a bit boring. Initially, I started to embroider little flowers on the top, but my flowers didn't quite turn out the way I visualized, and you can't really draw or trace on fleece, so I had to think of something else.
I cut out little flowers from ivory felt and stitched them to the tops.
And added little faux-pearl beads to the centers, and a little running stitch for the stem...
That's better.
Even toastier with some hot chai! Mmmmm. Perfect!
I think I have a matching fleece scarf crammed into another drawer somewhere...
It's getting cold in my studio/workshop/garage. Even if the fog burns off and the day warms up, unless it gets really hot, my workshop stays pretty cool. Which isn't so bad, but my hands get cold and I can't stand cold hands!
I've been coveting a pair of knit handwarmers since last winter and I've got all sorts of fabulous favorites over at Etsy, but I haven't found exactly what I'm looking for in terms of color and style. Then Erin went and knit up a whole batch a couple of weeks ago, and that really put me over the edge! I want to knit some too! I think that project will have to wait, as I am fully consumed by the never-ending knit scarf (which I still love!), and definitely don't have the skills yet for that sort of project.
But as I was thinking about my cold hands, and coveting (as I do), I remembered a pair of Old Navy fleece gloves that I had crammed into a drawer in my dresser. I hardly ever wore them, and I thought I might be able to make them at least partially cute.
I started by cutting off the fingers and thumb.
Then I whipstitched around the cut openings.
I used ordinary embroidery floss...simple.
That was easy, but I still thought they were a bit boring. Initially, I started to embroider little flowers on the top, but my flowers didn't quite turn out the way I visualized, and you can't really draw or trace on fleece, so I had to think of something else.
I cut out little flowers from ivory felt and stitched them to the tops.
And added little faux-pearl beads to the centers, and a little running stitch for the stem...
That's better.
Even toastier with some hot chai! Mmmmm. Perfect!
I think I have a matching fleece scarf crammed into another drawer somewhere...
Subscribe to:
Posts (Atom)