Showing posts with label tutorial. Show all posts

Saturday, September 4, 2010

Tutorial: Little Girls D-ring Belt Apron

(originally published January 29, 2007)

I get asked, periodically, if I make little girls aprons. I do not. I love them, they're darling, and the little girls wearing them is the cutest picture. I just don't have time, and I find I have to be careful how I diversify and add new products.


However, if you recall last April/May, I did make a whole batch for my little friend Rachel, who was turning 5 and having a tea party birthday. It was so fun, and it was so easy - too easy really, and I'd much rather share how I did it, rather than release a whole line of little sweets.

What I like about this little apron is the belt feature - I used a D-ring ribbon belt as the band/tie, which eliminates the frustration of little fingers trying to tie apron strings. A great tutorial on making a D-ring Ribbon Belt (as well as all the supplies) can be found on the J. Caroline Creative site (also a great resource for lots of fun stuff!) (note: since this was originally posted, J. Caroline has closed their craft supply site. Try Google!).

Really, this is very simple - but first a disclaimer! I have no idea how to write or explain what I do. For this project, I simply made a childs' apron, and snapped photos along the way. It's not perfect, and I'm sure many of you will be able to create something far better then what I am showing. But it's easy and your little girl will be over the moon! This is also a great gift bag item for a birthday party...especially if it's a tea party!


Start with a heavier weight home dec fabric. I suggest prewashing it, and pressing it. You will then cut it into a 16 x 21 piece. Also, assemble matching Extra Wide Double Fold Bias Tape and your ribbon belt (the belt I used is 40" long, finished, but you can make them as long or short as you need to).

Pin the bias tape in place on all three sides (both sides and bottom), leaving the top edge free.


Machine stitch the bias tape in place.


Press.


Then, with right side facing up, press the top line of fabric down about 1/2 inch. Alternatively, you can serge the raw edge here, and skip the pressing.


Pin in place, and stitch along the top edge.


When you get to the end of the apron, pivot and stitch down the side to the end of the ribbon and then along the bottom edge, pivot again and stitch to meet up again where you started.
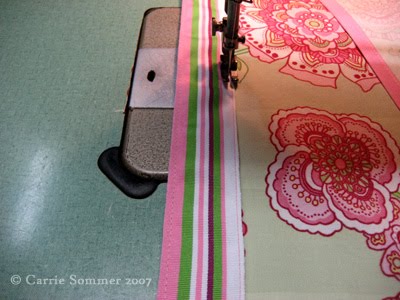


Cut your threads, press, and you are done! Wasn't that easy? Isn't it darling?


Another totally cute and fun thing to do is embroider the girls' names on the apron, as I did for Rachel. You can write their names freehand with quilters chalk and then just go for it!

Sunday, August 29, 2010

Tutorial: Lingerie and/or Utility Bag

originally published January 2, 2008)

Happy New Year my dear sweet blog friends! I was cleaning the studio yesterday (I know, *gasp!*), and I came across a bunch of lingerie bags from a while ago when I offered them on my site. I think I pulled them a year ago...they didn't sell well (read: at all), and while it might have been a good idea, perhaps not a good product offering.

In the year since, I've used them in many ways other than their intended purpose. Turns out, they are the perfect size for shoes, and work well when traveling. They are also a fabulous project bag, especially now that I am knitting and have a few things going at once.

They are also quite easy to make, and that is what I want to share with you today!

To start, you'll need about a 1/2 yard of fabric, folded and about a 36" piece of twill tape or ribbon (plus, thread, scissors and...a sewing machine...duh.). I'm using a lightweight linen here. I've made a simple pattern with a 12" x 18" piece of posterboard. Place the posterboard directly on the fabric with one edge on the fold.


Trace pattern directly onto fabric, and then cut out. You'll end up with a long rectangle of fabric when open.


If you are using a plain fabric (like I am here), you can easily embellish the bag later with embroidery, stencils, patchwork or little die-cut pieces of fabric. I think I'll add some fun die-cut fabric pieces. I found some simple shapes online and printed them out to make a little pattern, and then cut them out of some fun fabric.


(Not shown: I also used the die-cut patterns to cut out a piece of double-sided interfacing to help adhere the die-cuts to the linen later.) Put these aside for now.


Next, take your main fabric, open it, and with the wrong side facing you, press the top 4 inches of the sides in. That's not articulated very well, but check out the photo above and below, and do like that! You don't have to measure with this project, just eyeball it.


Do this on all four corners/sides. Then, press down the two top edge pieces about 2 inches from the top. You could serge this if you want, I did not.


Next, sew this piece down about 1/4" from the cut edge.


Then, using your sewing machine guide, sew across again with a 3/4" seam allowance. By doing this, you are creating a little tube for the drawstring.


Next, remember your cute embellishment? Now is the time to attach it. If you are using a die-cut piece of fabric, first adhere it to the right side of the fabric with lightweight double-sided fusible interfacing.


You can then embellish it further with embroidery - I whipstitched around the bra & bikini shown above (but forgot to take a picture of it! sorry!).


Then, turn the piece wrong side out, matching up the top pieces, and begin stitching the sides together below the last horizontal stitch line. You can start at the 1/4" seam allowance guide on your machine, because that turned in portion at the top will end, and you will continue at 1/2" seam allowance down the side of the bag. *Just remember not to start at the very, tippy top of the bag or your won't be able to insert your drawstring!


If you'd like, you can clip the bottom corner of the bag. Then turn it right-side out and press.


Take your twill tape or a piece of ribbon and attach a safety pin...


insert it into the second opening at the top and pull it through to the end. Then, insert it into the other side and continue pulling it through.


Make a little knot at the end so that little guy doesn't go anywhere...


Cinch it tight, and you are done!


Oh, look. Now I have three new utility bags! A lingerie bag, a shoe bag, and (*slaps forehead*) a knitting project bag!


I know which one I'll be using!


I hope you try this! Contrary to my super anal instructions, it's very, very, very easy! Enjoy!